EJB 3 Getting Started
EJB 2 had three areas of complexities
Three primary techniques in EJB 3 eliminate the above complexities
Java SE 5.0 added metadata annotations and this is easily the most important change in EJB 3, annotations simplify the EJB programming model and remove the need for detailed deployment descriptors and act as a delivery mechanism for dependency injection. They allow you to attach additional information (attributes) to a Java class, interface, method or variable. Annotations can be used by development environments like Eclipse, the Java compiler, persistence providers like Hibernate or a runtime environment like the Java EE container.
| Annotation example | import mypackage.Sport; @Sport("football"); |
| XML deployment descriptor to override above annotation | <Interests> <Interest> <SportClass>DatadiskEJB</SportClass> <Sport>soccer</Sport> </Interest> </Interests> |
The @Sport is the annotation, which is a special kind of interface and must be imported hence the import syntax. Annotations humble beginnings is the grandparent of JavaDoc tags, which itself was the XDoclet tool. XDoclet acted as a source code preprocessor that allowed you to process custom Java Doc tags and do whatever you needed to do with the tagged source code or even the EJB 2 deployment descriptors.
One note about annotations is that you should still use deployment descriptors if things change regularly, otherwise you will have to change the source code, XML deployment descriptors override any annotation settings where appropriate and you can mix and match were necessary (see above for overriding example).
A deployment descriptor is a simple XML file that contains application configuration information, they are kinda of hard to read and to understand, hence why the less we deal with them the better, EJB 3 makes deployment descriptors completely optional.
There are a number of common metadata annotations
| Annotation | Usage | Components that use them |
| javax.annotation.Resource | Dependency injection of resources such as Data-Source, JMS objects, etc | EJB, web, application client |
| javax.ejb.EJB | Dependency injection of session beans | EJB, web, application client |
| javax.jws.WebServiceRef | Dependency injection of web services | EJB, web, application client |
| javax.persistence.PersistenceContext | Dependency injection of container-managed EntityManager | EJB, web |
| javax.persistence.PersistenceUnit | Dependency injection of EntityManagerFactory | EJB, web |
| javax.annotation.PostConstruct | Lifecycle method | EJB, web |
| javax.annotation.PreDestroy | Lifecycle method | EJB, web |
| javax.annotation.security.RunAs | Security | EJB, web |
| javax.annotation.security.RolesAllowed | Security | EJB |
| javax.annotation.security.PermitAll | Security | EJB |
| javax.annotation.security.DenyAll | Security | EJB |
| javax.annotation.DeclareRoles | Security | EJB, web |
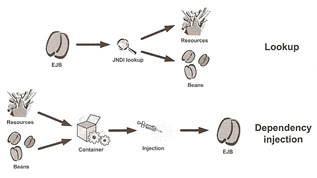
Almost every component uses another component or a resource to implement functionality, the main aim of Dependency Injection (DI) is make it as loosely coupled as possible, which means that one component should call another component or resource only through an interface and that components and resources should be glued together using configuration instead of code. In EJB 2 a JNDI lookup involved hard coding resource names into the bean, with DI the container reads the target bean configuration and figures out what beans and resources the target bean needs and injects them into the bean at runtime. DI allows you to declare component dependencies but lets the container deal with the complexities of service or resource instantiation, initialization, sequencing and supplies the service or resource references to the clients as required, @EJB will inject EJBs, @Resource will inject JMS resources, @PersistenceContext will inject container-managed EntityManager.
The test application I will use is from the EJB 3 in Action book, which is based on the Hibernate in Action book called the CaveatEmptor application so they should take credit for it. However sometimes unless you know the application you do become confused so in some parts I will create a generic piece of code that that be related to any application a sort of noddy piece of code just to see what is happening without learning the application. The test application in Enterprise Java Beans 3.0 book is a bit much for a beginner but is certainly worth a look after you get you feet wet.
One point I will make is that if you want a full description on how the application works then I suggest you buy the book, my website will only provided references and not full code explanations, it kind of a cheat sheet version, I will also be merging a number of books into a single website so that I have a single point of reference.
The ActionBazzar is a simple eBay like application, you place items into the systems for users to bid on, the application will be developed using more advanced technologies as we learn them.
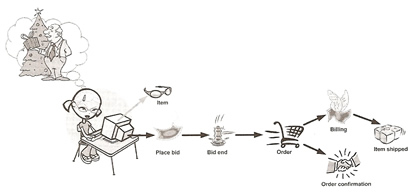
Like many e-businesses such as eBay, Amazon, you order a number of items and proceed to the checkout, you checkout your items and in a flash your order is complete from the users point of view, however in the background the order process is still continuing by checking credit card details, making sure the money has been obtained (you generally see this as processing from your account page), getting the items ready for delivery, all these processes are probably on different systems but all talking to one another, there will be a dependency between each other making that the order is processed correctly (obtain money before delivery, etc). Once all the processing has finished you generally receive an email stating your order has been completed.
Business logic and persistence components for the above set of actions can be implemented using EJB 3, the process can be visualized below within an EJB 3 architecture, but many other applications will use a very similar setup.
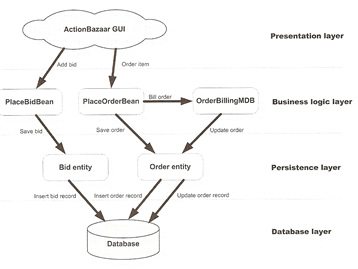
The above diagram represents a traditional four tier architecture, only two processes are triggered by the user, adding a bid to an item and ordering items won. The below is we are planning on using for each part of the application
Business Logic with Session Beans
Session beans should model business processes or actions, they control the business logic calling on other beans to get a task done. They come in two flavors
Stateless beans are used to perform actions or tasks that can be processed in one shot, such as placing a bid on an item in an auction. In this case all we need to do is place obtain a bid and persist it into a database, you could use something like below to achieve this
| Interface (remember code to interfaces) | package example.buslogic; import javax.ejb.Local; |
| stateless session example | package example.buslogic; import javax.ejb.stateless; import example.persistence.Bid; @Stateless public class PlaceBidBean implements PlaceBid { ... public PlaceBidBean() {} // Agreeing with the interface contract public Bid addBid(Bid bid) { System.out.println("Adding bid, bidder ID = " + bid.getBidderID() + ", item ID = " + bid.getItemID + "bid amount = " + bid.getBidAmount() + "."); return save(bid); } } |
The above code is very much like a POJO with the exception of the @local and @stateless annotations
| @Stateless | this tells the container that this is a stateless session bean, this means the container automatically will provide such services to the bean automatically concurrent control, thread safety, pooling and transaction management. You can add other services like transparent security and interceptors. |
| @Local | This tells the container that the session bean can be accessed via the local interface, which means that whatever accesses it will have to be running in the same JVM. The alternate is @remote which allows access to beans via the network using Remote Method Invocation (RMI). The last option you could have used is the @webservice annotation which allows non-java applications to access the bean. |
To access the above bean you can use the below client code
| simple client code | package example.buslogic; import javax.ejb.EJB; import javax.servlet.*; import javax.servlet.http.*; import java.io.*; import example.persistence.Bid; public class PlaceBidServlet extends HttpServlet { @EJB private PlaceBid placeBid; public void service(HttpServletRequest request, HttpServletResponse response) throws ServletException, IOException { int bidderID = Integer.parseInt(request.getParameter("bidder_id")); int itemID = Integer.parseInt(request.getParameter("item_id")); double bidAmount = Double.parseDouble(request.getParameter("bid_amount")); Bid bid = new Bid(); bid.setBidder(bidderID); bid.setitemID(itemID); bid.setBidAmount(bidAmount); placeBid.addBid(bid); ... } ... } |
Again everything looks like a normal POJO except for the @EJB annotation, throughout this EJB 3 topic I will be discussing more advanced features of the annotations already discussed
| @EJB | The @EJB annotation works in any component that is registered with the Java EE container (servlet, JSF). When the container see this annotation, it looks up the PlaceBid EJB behind the scenes and sets the placeBid variable to be retrieved EJB reference, if necessary the container will lookup the EJB remotely over RMI. The container will instantiate the placeBid variable with the EJB named PlaceBid before the variable is available for use. |
| Old EJB 2 way of doing the samething | Object ejbHome = new InitialContext().lookup("java:comp/env/PlaceBid"); PlaceBidHome placeBidHome = (PlaceBidHome) PortableRemoteObject.narrow(ejbHome, PlaceBidHome.class); PlaceBid placeBid = placeBidHome.create(); |
As you can see for the above example EJB 3 has come a long way to making things easier, the whole EJB 2 statement has been reduce to one line of code, thus reducing redundant code across your application, less error-prone.
The one thing to remember is that there is absolutely no need for the stateless bean to guarantee that the value of any of its variables will be the same across any two invocations, this is what statelessness means.
Stateful beans guarantee that a client can except to set the internal state of a bean and count on the state being maintained between any number of method calls. The container makes this happen by doing two important things, firstly the container ensures that a client can reach a bean dedicated to it across more than one method call, secondly the container ensures that the bean instance variable values are maintained for the duration of a session without you having to write any session maintenance code, this technology stops you having to fiddle around with HTTP session, browser cookies or hidden HTML form variables to try and accomplish the same thing.
Using the ActionBazzar application the ordering process would be a good example to use a stateful session bean, since it is broken into four steps
With a stateful bean the data the user enters at each step can be cached into bean variables until the ordering workflow completes, when the user confirms the order.
| Interface | package example.buslogic; import javax.ejb.Remote; |
| Stateful bean example | package example.buslogic; import javax.ejb.*; |
As you can see in the above code, there is not much difference between a stateless and a stateful session bean, and the code still remains simple, however there are few new annotations to discuss
| @Stateful | This annotation tells the container to use the same session bean, this will be a dedicated bean for the clients session, they are not pooled beans unlike stateless beans. There is a optimization technique called passivation which will be discussed later that helps in reducing memory consumption. |
| @Remote | This annotation enables remote-client access |
| @Remove | This annotation marks the end of the workflow by the stateful bean, it tells the container that it no longer requires to maintain the beans session, this helps the container to clear up resources ASAP, otherwise it would wait until the session timed out, before clearing up the session bean. This annotation is optional but critical from a server performance standpoint. |
A client program to access the above would look like the following, although I have not provided the full code, you can download it at Manning Publications web site under the EJB 3 in action book.
| client code | package example.buslogic; import javax.ejb.EJB; public class PlaceOrderTestClient { // This will pull in all the resources we need @EJB private static PlaceOrder placeOrder; public static void main(String[] args) throws Exception { System.out.println("Exercising PlaceOrder EJB... "); placeOrder.setBidderId(new Long(100)); placeOrder.addItem(new Long(200)); placeOrder.addItem(new Long(201)); placeOrder.setShippingInfo(new ShippingInfo("1 home sweet home", "MyCity", "MyCounty")); placeOrder.setBillingInfo("123456789", "VISA", "0123")); Long orderId = placeOrder.confirmOrder(); System.out.println("Order confirmation number: " + orderId); } } |
Note that the code above is again very simple (POJO centric) and could even be part of a JUnit test script. You can run the client code in an Application Client Container (ACC) which will inject the remote EJB into the standalone client code. An Application Client Container (ACC) is a mini Java EE container that can be run from the commandline, its a souped-up JVM with some Java EE added. You can run any Java SE client such as a Swing application inside the ACC as if you were running in a regular JVM. The client container can look up and inject EJBs on remote servers, communicate with remote EJBs using RMI, provide authentication and authorization, etc.
Any Java class with a main method can be run inside the ACC, including JAR files as long as the Manifest file contains a Main-Class entry, the JAR can contain a jndi.properties file and an application-client.xml file that contains the environment for connecting to a remote EJB container.
| GlassFish example | appclient -client test_program.jar |
Messaging has numerous uses including system integration, asynchronous processing, and distributed system communication. Java EE messaging makes messaging robust by adding a reliable middleman between sender and receiver, this middleman is called a messaging destination, powered by message-oriented middleware (MOM) servers like IBM MQSeries, or Progress Software SonicMQ. Java EE standardizes messaging through a well-known API, called the Java Messaging Service (JMS), upon which MDBs are heavily dependent.
I will go into great detail about JMS and MDBs in a later topic but here simple example code a MDB using JMS
| MDB producer example | package example.buslogic; ... import javax.annotation.Resource; import javax.ejb.Remove; import javax.ejb.Stateful; import javax.jms.*; ... @Stateful public class PlaceOrderBean implements PlaceOrder { @Resource(name="jms/QueueConnectionFactory") private ConnectionFactory connectionFactory; @Resource(name="jms/OrderBillingQueue") private Destination billingQueue; ... @Remove public Long onfirmOrder() { Order order = new Order(); order.setBidderId(bidderId); order.setItems(items); order.setShippingInfo(shippingInfo); order.setBillingInfo(billingInfo); saveOrder(order); billOrder(order); return order.getOrderId(); } ... private void billOrder(Order order) { try { Connection connection = connectionFactory.createConnection(); Session session connection.createSession(false, Session.AUTO_ACKNOWLEDGE); MessageProducer producer session.createProducer(billingQueue); ObjectMessage message = session.CreateObjectMessage(); message.setObject(order); producer.send(message); producer.close(); session.close(); connection.close(); } catch(Exception e) { e.printStackTrace(); } } } |
Notice the @Resource annotation which is a more general purpose injection, it can be used to inject anything the container knows about, it uses the name parameter which specifies what resource are bound to the EJBs environment naming context and injects them into the code.
I will be going into more depth on JMS in a later topic but for the time being here is the MDBs code that will process the message, again it only highlights what you need to know now.
| MDB consumer example | package example.buslogic; import javax.ejb.MessageDriven; public class OrderBillingMDB implements MessageListener { |
The @MessageDriven annotation makes the container transparently provide messaging and other EJB services into a POJO, the properties inside the annotation tell the container what JMS destination the MDB wants to receive messages from. The container in the background starts listening for messages set to the destination specified by the activation configuration properties, as soon as a message arrives at the destination, the container forwards it to an instance of the MDB, remember like stateless beans they are pooled.
MDB implement the javax.jms.MessageListener interface, this well know interface is used to invoke an MDB. The onMessage method defined by the interface has a single javax.jms.Message parameter that the container uses to pass a received message to the MDB.
The Java persistence API (JPA) is the persistence-tier solution for the Java EE platform, and it is vastly different from EJB 2. The JPA EntityManager interface defines the API for persistence while the JPA entities specify how application data is mapped to the database, I will have a complete topic on ORM-based persistence and provide a link when i have completed it.
I present some sample code so that you can get a feel on what is going on, i will have numerous other topics that will explain all in depth.
| persistence example | package example.persistence; import java.io.serializable; @Entity |
There are a number of annotation used here
| @Entity | this annotation signals that this bean is a JPA entity |
| @Table | tells the JPA that this entity is mapped to a specific table |
| @Id | this tells the JPA that this property is the primary key for the entity |
| @GeneratedValue | this tells the persistence provider that it should automatically generated the primary key when an entity is saved to the database. There are a number of options that you can use: table, sequence, identity key, etc. |
| @Column | Tells the JPA which properties maps to which table columns. |
So now that you have an entity bean how do you go about saving it to the database, you use the EntityManager to persist data, it does this by reading the ORM configuration and providing entity persistence services through an API-based interface. The EntityManager knows how to update entity stored in the database; delete data mapped to an entity instance from the database; read data from the database and store data to a database.
Again I present some sample code using a session bean so that you can get a feel on what is going on
| persisting data | package example.buslogic; ... import javax.persistence.PersistenceContext; import javax.persistence.EntityManager; ... @Stateless public class PlaceBidBean implements PlaceBid { // Inject instance EntityManager @PersistanceContext(unitName="actionBazzar") private EntityManager entityManager; ... public Bid addBid(Bid bid) { System.out.println("Adding bid, bidder ID = " + bid.getBidderID() + ", Item ID = " + bid.getItemID() + ", Bid Amount = " + bid.getBidAmount() ); return save(bid); } public Bid save(Bid bid) { // Persists enity intance entityManager.persist(bid); return bid; } } |
The EntityManager acts as an interpreter between the OO and relational worlds, the entitymanager reads the ORM mapping annotations like @Table and @Column on the entity and figures out how to save the entity into the database. The unitName parameter points to the persistence unit specific to this application, a persistence unit is a group of entities packaged together in an application module. In the background a normal SQL statement will be executed "INSERT INTO BIDS ......." to insert the record, this again has been created by using the annotations in the entity.