Advanced Tomcat Features
The following subjects are discussed
Valves
Valves are specific to Tomcat, they are similar to filters, they can intercept any incoming and outgoing request. Valves are managed by the Engine, they access incoming/outgoing requests before they are handled by the servlet and JSP processing logic. Logically they can also be applied on a virtual host or web application basis. Valves can add the following functionality
Valves are nested components in the component model, they use the <valve> XML element in the server.xml file, they can be placed in the <Engine>, <Host> or <Context> containers. The Java programming interface org.apache.catalina.Valve is used and well documented.
The valve is completely separate from Tomcats logging, which captures warning, error messages for the Tomcat server itself. Access Log Valves uses it own logic to examine each incoming request for Web resources and only captures the access request information to its own log file, there are plenty of log analysis tools that can be used against the log file.
The scope of logging depends on where the Valve is placed (Engine, Host, Context). Valves have attributes that can be applied for logging
Valve Component Attributes |
||
| Attribute | Description | Required? |
| className | The Java class that the Service uses by default it uses org.apache.catalina.valves.AccessLogValve | Yes |
| condition | Provides conditional logging capability, you can control what is being logged | No |
| directory | The directory were the log files will be placed | No |
| fileDateFormat | Use this in conjunction with rotatable attribute to control the period of time between log rotation | No |
| pattern | This attribute specifies the format used in the log. You can of course customize the format, or you can use the common or combined format. The shorthand pattern name common (which is also the default) corresponds to '%h %l %u %t "%r" %s %b'.
|
No |
| resolveHosts | Determines if the log will contain hostnames via a reverse DNS lookup | No |
| prefix | The prefix added to the name of the log file | No |
| suffix | The suffix added to the name of the log file | No |
| rotatable | A boolean value, default is true which means support for rolling log files. This uses the fileDateFormat attribute. | No |
Valve Example |
||
| Example 1 | <Valve className='org.apache.catalina.valves.FastCommonAccessLogValve' |
|
| Example 2 | <Valve className="org.apache.catalina.valves.AccessLogValve" Note: the FastCommonAccessLogValve does have improved performance supposedly but is the class deprecated. |
|
When a user hits a protected web page the user is required to authenticate (sign-on), the Single Sign-on Valve caches this information on the server side and will authenticate users using this cached information as they access other protected web pages, without this valve the user will be required to authenticate at each protected web page.
To enable Single Sign-on Valve for a virtual host, you place a <Valve> element inside the <Host> element in the server.xml file as below
| Single Sign-on | <Valve className='org.apache.catalina.authenicator.SingleSignOn'/> |
You need to restart both Tomcat and the Browser (due to cached information). If you experience problems with Single Sign-on it is probably a caching issue so make sure all caches are flushed this includes both Tomcat and your Browser.
You can override the default authentication form by using the below, this allows you to use different text encoding
| Change default authentication form | <Valve className='org.apache.catalina.authenticator.FormAuthenticator" characterEncoding=UTF-8"/> |
Restricting Access (Request Filter)
A request filter can be a useful Valve as it can block of filter specific client requests, you can create your own security like policies to block IP addresses.
The Request filter has a number of attributes
Request Filter Component Attributes |
||
| Attribute | Description | Required? |
| className | The Java class that the Service uses by default it uses org.apache.catalina.valves.RemoteAddrValve | Yes |
| allow | An IP address specified using a regular expression that matches the address of incoming requests | No |
| deny | An IP address specified using a regular expression that matches the address of incoming requests | No |
Request Filter Example |
||
| example | <Valve className='org.apache.catalina.valves.RemoteAddrValve' allow='192.168.0.*,*.datadisk.co.uk'/> <Valve className='org.apache.catalina.valves.RemoteAddrValve' deny='127.0.0.1'/> |
|
Request Dumper Valve
The request dumper valve dumps the headers and cookies or request and responses to the log of the associated component, they serve two purposes
Request DumperFilter Example |
||
| example | <Valve className='org.apache.catalina.valves.RequestDumperValve'/> Note: this can be used in Engine, Host or Context |
|
By default persistent sessions is not configured, when Tomcat is shutdown all session information is lost, also all timed out sessions session information is lost. With Persistent Session Manager, the following can be enabled
At this time the persistent manager is not ready for a production system (still experimental), so test thoroughly if you are going to use this.
You configure Persistent Session Manager via the <Manager> element in the Web applications <Context> element, it is placed in the WEb applications META-INF/context.xml file, you can create a global version by adding to context.xml file in the conf directory.
The Persistent Session Manager has many attributes
Persistent Session Manager Component Attributes |
||
| Attribute | Description | Required? |
| className | The Java class that the Service uses by default it uses org.apache.catalina.session.PersistentManager | Yes |
| algorithm | The algorithm used for generating the session ID's, by default MD5 is used | No |
| distributable | When true the Session Manager will enforce that all session attributes be serializable, default is false | No |
| entropy | The seed string value used in generating randomized session ID's by the persistence manager , default is a random computerized value. | No |
| maxActiveSessions | The maximum number of active sessions before swapping out the session via the Persistent Session Manager begins. The default is -1 unlimited number of active sessions. | No |
| minIdleSwap | The minimum number of seconds before a session will be considered for swapping, the default is -1 enables swapping at any time. | No |
| minIdleSwap | The maximum number of seconds before a session is eligible to be swapped out to store, the default is -1 and the session will be swapped without an eligibility check | No |
| maxIdleBackup | The number of seconds since a session was last active before it is backed up on the store, the default -1 means that backup is disabled | No |
| randomClass | use java.util.Random instead of the default java.security.SecureRandom | No |
| saveOnRestart | By default Tomcat will save all the active sessions to the store upon shutdown and will reload the sessions from the store upon startup, the default is true | No |
| sessionIdleLength | The length of the session ID created by Session Manager instance, default is 16 | No |
| store | Used by the Persistent Session Manager to determine how and where to save the session. The only two available options are org.apache.catalina.session.FileStore, org.apache.catalina.session.JDBCStore | 1 |
Persistent Session Manager Example |
||
| Example | <Context> Note: normally this is in the Web applications WEB-INF/context.xml file |
|
The persistent session information is stored in work/Catalina/localhost/<web app> directory, it will have the extension .session.
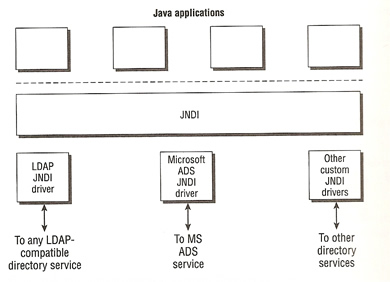
Java Naming and Directory Interface (JNDI) is an API used to lookup information pertaining to the network, it works with other naming and directory services (Active Directory, NIS, LDAP). Basically JNDI has drivers that are used to access these other services.
Tomcat is a J2EE compliant and Servlet 2.4 compliant server that will facilitate the use of JNDI by hosted Web applications.The WEb applications will use JNDI to retrieve JNDI resources, it does this by using standard programming conventions and API's. The Tomcat container intercepts the standard JNDI requests from the application, then it will use preconfigured resources (server.xml or context.xml) to determine what needs to be passed back to the application, Tomcat basically provides a JNDI emulation service for accessing these resources.
There are two commonly used JNDI resources that are used but there are many others
To access data from a database, the application must first obtain an initial Context DataSource object. For an application to access mail servers and send mail, the application must obtain a JavaMail Session object.
I will now explain how to setup both but first a quick look at how to configuring Resources via JNDI
You have three options for configuring the resource within the hierarchy of Tomcat configuration components
You can add subelements to the <DefaultContext> and <Context> level
JNDI Resource Component Subelements |
||
| Subelement | Description | How Many? |
| Environment | Create environment entries available from the JNDI InitialContext that Tomcat will supply to an application | 0 or more |
| Resource | Provides the name of the datatype of a JNDI resource to the application | 0 or more |
| ResourceParams | Specifies the Java programming class that is used to create the resources, and specifies a configuration JavaBean | 0 or more |
| ResourceLink | Adds a link to the resource defined in the <GlobalNamingResource> element, which is server-wide | 0 or more |
Each of the above subelements can have attributes
Environment Attributes |
||
| Attribute | Description | Required? |
| name | The JNDI name for this element | Yes |
| type | Java class name of the datatype represented by this element | Yes |
| value | The actual value of the environment entry | Yes |
| description | Text description for this element | No |
| override | Application programmers can use the <env-entry> element to override the one defined here. You can disable this by setting it to false | No |
Resource Attributes |
||
| Attribute | Description | Required? |
| name | Name of the resource | Yes |
| type | Java class name of the datatype represented by this resource | Yes |
| auth | Indicates who does the authenication, if application then the application itself must sign on with the resource manager, if container then the container does a sign-on with the resource manager. | No |
| description | Text description for this resource | No |
| scope | Can be either Shareable or UnShareable, which determines if the resource can be shared | No |
ResourceParams Attributes |
||
| Attribute | Description | Required? |
| name | Name of corresponding resource | Yes |
ResourceLink Attributes |
||
| Attribute | Description | Required? |
| global | The name of the resource being linked to | Yes |
| name | The name of the resource, accessible by the Web application via JNDI lookup | Yes |
| type | Java class name indicating the type of the resource returned | Yes |
Examples |
||
| Environment | <Environment name='maxUsers' type='java.lang.Integer' value='100'/> Note: will add a JNDI entry named maxUsers with a value of 100 |
|
| Resource | <Resource name='myDatabase' type='org.apache.catalina.UserDatabase'> Note: add a JNDI addressable resource called 'myDatabase' that has a type of 'UserDatabase', this could be in <GlobalNamingResource> so that all servers and engines can have access to it |
|
| ResourceParams | <ResourceParams name='jdbc/datadiskDatabase'> Note: you can add as many <name>/<value> pairs as you like and are referenced using the JNDI name jdbc/datadiskDatabase |
|
| ResourceLink | <ResourceLink name='localDatabase' global='myDatabase' type='org.apache.catalina.UserDatabase'/> Note: you can link <GlobalNamingResource> elements in to a single Web applications <Context> element, here we link the JNDI addressable resource called localDatabase to the global JNDI addressable resource myDatabase |
|
I am only going to touch on how to configure a JDBC resource
JDBC Resource Example |
|
| Setup the Resource | File: webapps/<app name>/META-INF/context.xml |
| Setup the ResourceParams | File: webapps/<app name>/META-INF/context.xml <ResourceParams name='jdbc/datadiskDB'> Note: there are other params that you need but i think you get the idea |
| Declare the resource in the deployment descriptor | file: webapps/<app name>/META-INF/web.xml <resource-ref> |
| Java Code | private final Object lock = new Object(); |
Now a quick look at setting up JavaMail
JavaMail Resource Example |
|
| Setup the Resource and ResourceParams | File: webapps/<app name>/META-INF/context.xml |
| Declare the resource in the deployment descriptor | file: webapps/<app name>/META-INF/web.xml <resource-ref> |
| Download the JavaMail libraries | http://java.sun.com/products/javamail/downloads/index.html |
| Compile the SendMailServlet | copy the SendMailServlet.class file to webapps/<web app>/WEB-INF/classes directory file: webapps/<app name>/META-INF/web.xml <servlet> |
| Creating the sendmail.jsp | copy the sendmail.jsp to webapps/<web app>/jsp/mail directory |
| Access the web page | http://localhost:8080/<web app>/jsp/mail/sendmail.jsp |
Configuring LifeCycle Listeners
Many top-level components (Server, Service, Realms, etc) support the configuration of lifecycle listeners. Lifecycle listeners are Java modules that can be hooked into the server logic and executed during specific moments during the lifecycle of a component. This enables functionality to be introduced to the server without having to change the core server code base.
Lifecycle listeners are code that listens to specific lifecycle events, these points include
You may use lifecycle listeners to add new processing logic to the server. You use the <Listener> element inside the associated component, listeners are not a nested component, they should be thought of as an extended attribute of the containing XML element.
Listener Element |
||
| Attribute | Description | Required? |
| className | Java class that implements the listener logic, by default org.apache.catalina.LifecycleListener | Yes |
| descriptors | semi-colon separated list of MBean descriptor XML files | No |
Listener Example |
||
| example | <Server port='8005' shutdown='SHUTDOWN' debug='0'> Note: the above is the default JMX MBean support listeners |
|
Displaying MBeans Created by Lifecycle Listeners (using JMX proxy) |
||
| http://localhost:8080/manager/jmxproxy/?qry=*%3Atype%3DRole%2C* | ||
I will be discussing JMX MBeans in a later topic, basically they are objects that enable Tomcat components, structures and resources to be monitored or accessed via an external management system.
To remove a listener just comment out the <Listener> element. There are two other listeners that you should be aware off the APR lifecycle listener and the JSP processor listener, these are configured by default, they both initialize there respected components APR and JSP processor (Jasper).