Physical Standby Database
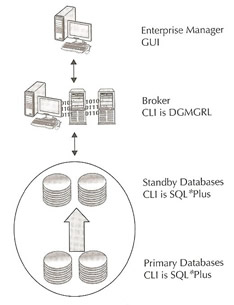
You have three option on how to configure a physical standby database
If you decide to use Enterprise Manager or Data Guard Broker you will not be able to manage Data Guard using SQL*Plus, unless you remove the Broker, this not to say you cannot change things with SQL*Plus but the broker will reconfigure it on how it thinks the configuration should be as rightly so as it is the keeper, this can get very confusing, so the bottom line is if you use the Broker don't use SQL*Plus.
I have a section on the Data Guard broker on how to configure and use see Data Guard Broker for more information, if using the Enterprise Manager Grid Control and the Data Guard Broker it will automatically setup the below for you.
Whether you decide to use Enterprise Manager, Data Guard Broker or SQL*Plus you must have the following already configured
Once you have the above configured you are ready to start to configure a standby database.
Using RMAN to configure a standby is also known as the "Power user" method, you have complete control over the configuration, also using this method you get a complete understanding on what does on in the background if your were to use the Enterprise Manager. There are many ways to setup a standby database manually copying files across the network, use mirroring and snapshotting, but the best method is to use RMAN, most dba's have a good understanding of RMAN. In this section i am only going to cover 11g, if yo are using 10g then I will point you to the internet on how to create a standby database using RMAN using 10g, I may come back to this topic when I have enough time to revisit the 10g side of things.
RMAN 11g has a number of improvements than the last version, which makes life simpler.
There are a number of parameters that you should be aware of, there are three types
As there are numerous parameters I am only going to touch on what you require to get a standby database configured
Independent Parameters |
|
| DB_UNIQUE_NAME | this parameter defines the unique name of the database, it has to be different for each primary or standby database, Data Guard uses this parameter to identify each server within the configuration. Change this parameter does not require a bounce of the database. db_unique_name='Prod1' |
| LOG_ARCHIVE_CONFIG | this defines the list of valid DB_UNIQUQ_NAME parameters for you Data Guard configuration, it provides a security check for Data Guard that the connection between the databases is allowed log_archive_config='db_config=(Prod1,Prod1DR)' |
| LOG_ARCHIVE_MAX_PROCESSES | this parameter has a default of 2 which is not enough, archive processes are responsible for archiving the ORL files as they become full and for resolving gaps in the redo stream to a standby database and on a standby database they are responsible for archiving the SRL files and forwarding the archive logs to a cascaded standby database. log_archivemax_processes='4' |
| DB_CREATE_FILE_DEST | this parameter needs to be defined a the standby database if using ASM db_create_file_dest='+DATA' |
Primary Parameters |
|
| LOG_ARCHIVE_DEST_n | this is the main redo transport parameter, normally you should be using the flash recovery area, this parameter has a number of attributes, the following are required
The example below is a standby database using maximum protection, this standby would be closer to the primary and network latency would be low, hence why we use the synchronous method Remember you can have up to nine standby databases The following attributes are optional
|
| LOGARCHIVE_DEST_STATE_n | this parameter enables or disables its companion parameter log_archive_dest_n |
Standby Parameter |
|
| DB_FILE_NAME_CONVERT | allows you to logically move the data files from their primary database location to your standby database location. For example db_file_name_convert='/Prod1/','/Prod1DR/' this would translate database files from this /u01/oradata/Prod1/sysaux.dbf to this /u01/oradata/Prod1DR/sysaux.dbf you can allow do this with ASM disks db_file_name_convert='+DATA','+RECOVERY' |
| LOG_FILE_NAME_CONVERT | this performs he same function as above for ORL and any SRL files |
| FAL_SERVER | FAL is Fetch Archive Log, it is only used on a physical standby database and is used to fetch missing archive log files from one of the databases (primary or standby), it is sometimes referred to as reactive gap resolution, make use you use the TNS names. fal_server='Prod1, Prod1DR' |
| FAL_CLIENT | this parameter list the name of the standby database that wishes to receive the gap request fal_client='Prod1DR' |
| STANDBY_FILE_MANAGEMENT | this parameter is only used for physical standby databases, when ever data files are added or dropped from the primary the changes are reflected automatically to the standby database if this parameter has been set to AUTO, basically the DDL is executed on the standby database to create or remove any of the data files. |
Now that we have a good understanding of the parameters required it is time to create a physical standby database
Create a physical standby database using RMAN |
|
| Quick tests before we start | ## Just do a quick tnsping on both instances from each database, fix any errors ## Run from the primary ping primaydg01 ping physicaldg01 tnsping Prod1 tnsping Prod1DR ## Run from the standby ping primaydg01 ping physicaldg01 tnsping Prod1 tnsping Prod1DR |
| Prepare the standby database | ## First create a static listener entry for the standby database, remember to reload the SID_LIST_LISTENER = ## Now reload the listener ## Create a init.ora file with only the db_name in it, this file will be relaced by RMAN |
| Prepare the primary database | ## I will be using ASM and creating 4 SRL logfiles, I will not be multiplexing he SRL log files ## hence i will be using the FLASH area only, run the following on the primary database db_create_file_dest='+DATA'; db_create_online_log_dest_1='+FLASH'; db_create_online_log_dest_2='+DATA'; alter database add standby logfile '+FLASH' size 50m; alter database add standby logfile '+FLASH' size 50m; alter database add standby logfile '+FLASH' size 50m; alter database add standby logfile '+FLASH' size 50m; |
| Create the standby database (run on the primary) |
## RMAN will create the standby database, the below can be run for either the primary or the Note: if you ever get an error message stating the the audit trail file could not be created look back in the output and find where the audit trail file is trying to be created, I got this error message and it was trying to create it in /u01/app/oracle/admin/PROD1LR/adump, so make sure that directory exists on the physical standby, create this directory if needed. |
| Finish off the standby | ## To finish off the standby and get start the apply process follow below, on the standby run the ## following commands alter system set fal_server='Prod1'; alter system set fal_client='Prod1DR'; alter system set log_archive_config='dg_config=(Prod1,Prod1DR)'; alter system set standby_file_management='auto'; alter system set log_archive_dest_2='service=Prod1 ASYNC db_unique_name=Prod1 valid_for=(primary_role,online_logfile); ## Now start the apply process alter database recover managed standby database using current logfile disconnect; |
| Finish off the primary | ## Lastly we finish off the primary, run the following commands on the primary database alter system set log_archive_config='dg_config=(Prod1,Prod1DR)'; alter system set log_archive_dest_2='service=Prod1DR ASYNC db_unique_name=Prod1DR valid_for=(primary_role,online_logfile); alter system switch logfile; alter system set fal_server='Prod1DR'; alter system set fal_client='Prod1'; alter system set standby_file_management='auto'; |
You should have a fully working Data Guard system with a physical standby database running and applying the redo logs shipped to it from the primary database server.
I have a number of topics that you may want to view regarding a physical standby database