In my last section on the VMware series I am going to cover advanced configuration tools, I will be covering host profiles, vCLI, , PowerCLI. I am from a Unix background and if I can I try to script everything this eliminates the human error factor, once you know a script works then you can run hundreds of times knowing that the same outcome will occur, you can script many common tasks in VMware.
There are a few new features in version 4
- Host Profiles which almost eliminate the need for complex scripted installations
- The next generation of command-line tools which allow everyone to script configurations of not just ESXi servers but also the vCenter environment
Below is a list of the current tools that are available for with VMware
| Local CLI at the ESXi host |
You require root level access and a SSH connection (PuTTy), this is idea for those who like the command-line and using switches, a bit like the Unix world. |
| vSphere CLI |
vCLI allows you to run commands from your Window/Linux server remotely without an SSH session, not all commands available at the local CLI are available in the vCLI |
vSphere PowerCLI
(toolkit for windows/Powershell toolkit) |
PowerCLI plugs directly into vCenter remotely and carries out many functions that aren't even exposed in the GUI. You should have a good knowledge of object-oriented programming (objects, properties, attributes, etc). |
vSphere Perl
(Perl vSphere PowerCLI) |
This toolkit exposes the same functionality as the PowerShell toolkit |
| vSphere Management Assistant |
aggregates much of the functionality seen in the vCLI and the Perl toolkit, it allows for an interactive CLI to ESX classic and ESXi, it also automates much of the authentication issues, meaning you have no need to disclose the root account |
| Host Profiles |
are not a scripting engine or CLI tool but carry out many of the post configuration tasks of an ESXi server normally undertaken with scripting, you can achieve the same results with host profiles as with scripting, so if you don't like script this is the way to go. |
Host Profiles
Host profiles allow you to capture the configuration of a ESXi server and apply it another ESXi server, essentially it acts like a policy object that can be applied to either an ESXi server or cluster in the vCenter inventory, thus you can cut down on the scripting element. If you want maximum control over any settings that make up your ESX server than scripted installation is the way to go, but if you are using ESXi host profiles may be a better route because they are relatively easy to use and require no scripting knowledge whatsoever.
Host profiles have five main functions
- Capture the configuration profile of an existing host
- Apply the configuration profile to a new ESXi server
- Confirm that an ESXi server is correctly configured
- Prompt the administrator for per ESXi server settings such as VMKernel network configuration
- Apply the profile as an ESXi host is added into vCenter cluster - a mere drag and drop event configures the ESXi server
You cannot install additional software into the ESXi server and there are some issues with the HA agent starting, but they are ideal for masse rollouts of ESXi servers. Host profiles are associated with the vCenter you logged in to when you create them, they are not available across multiple vCenters even in linked mode, also the vCenter must manage the ESXi server.
| create and edit a host profile |
Firstly may want to prebuild a clean ESXi server and apply a modest vSwitch, NTP and firewall configuration. try to build as much as you can so that you don't have to tweak to much after applying to a new ESXi server. Host profiles have many number of settings, I am not going to show you all of them but do have a look and play around.
First right-click the source ESXi server and choose host profile, then select "Create Profile from Host"

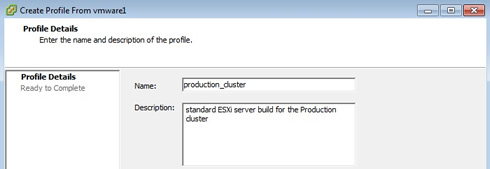
Type in a friendly name and a description
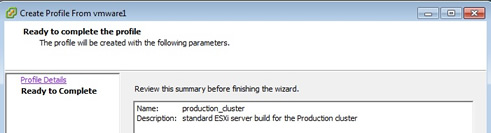
Next we get the summary screen
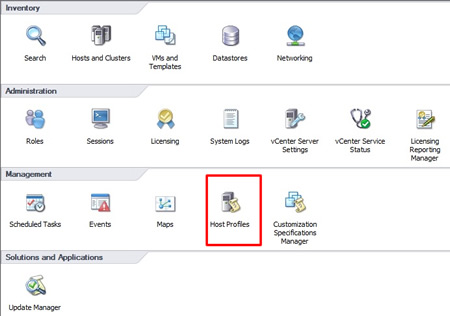
Now go to the home page and select "Host Profiles"
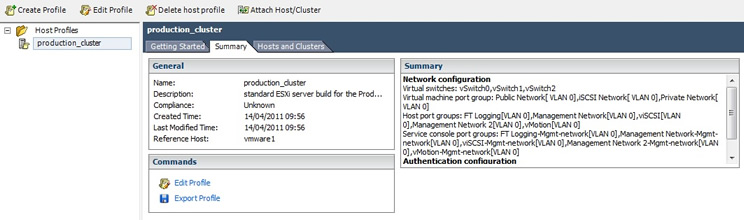
This is the main host profiles screen, we will discuss some of this later, you can edit the production_cluster profile we created by selecting the "edit profile" link
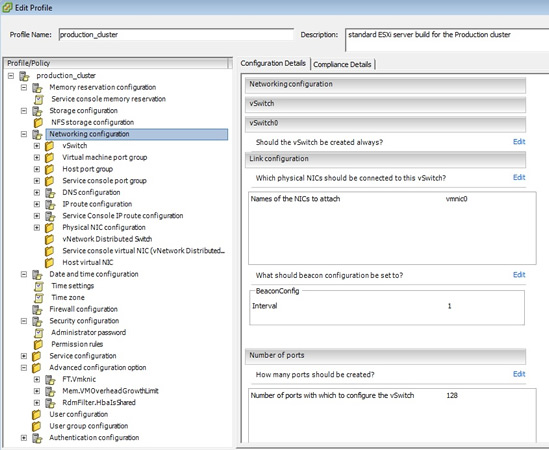
if you select the "edit profile", you will see the edit edit screen, this has vast amounts of information, there is lots to configure here, hence why I stated earlier that when you build the first source ESXi server try to configure as much possible
|
Once you have created and configured your host profile you might want to test it against some existing ESXi servers to see if they are compliant with your build, next we attach a a ESXi server to the host profile and apply it
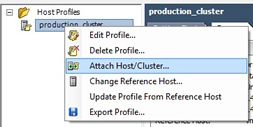
| Attaching and applying host profiles |
To attach ESXi servers to you host profile, right-click the host profile and select "Attach Host/Cluster"
Select the cluster or the ESXi server/s you want to attach
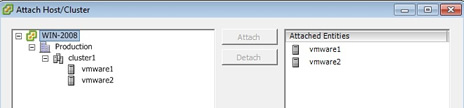
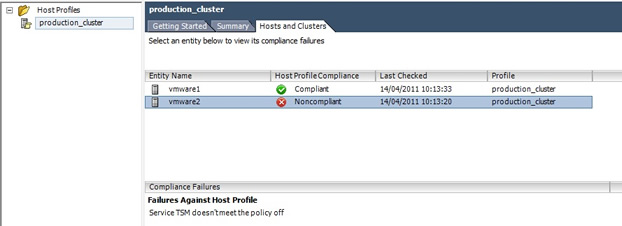
In the "Hosts and Clusters" tab you can now see two ESXi servers attached to the "production_cluster" host profile, and if you notice in the top right-hand corner the links are now live, you can apply this profile to a host or check its compliance, which is what we are going to do now

Select each ESXi server in turn and click the "Check Compliance Now" link, vmware1 should be compliant as this is the ESXi server we created the host profile with in the first place, however vmware2 is not compliant as the TSM service is different
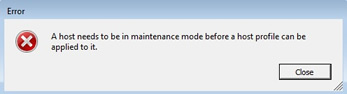
Before you apply a host profile to a ESXi server it must be in maintenance mode, then just click the "apply profile" link, below is the screen you get if your ESXi server is not in maintenance mode
You may have to tweak the ESXi server after applying the profile (IP address, etc) but 99% of the configuration should be complete. |
You also have the ability to export the host profile, this can then be imported on another vCenter server, the host profile is saved in the VMware Profile Format (.vpf) format as seen below

vCLI
vCLI does not cover all the commands that the service console does, for instance you cannot add a second service console port for the VMware iSCSI software initiator and VMware HA, you cannot open firewall ports for the iSCSI. vCLI comes in three flavors
- Windows installer
- Linux installer
- Downloadable VM (called VMware management appliance)
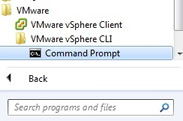
They all use the perl environment, so if you are using windows you need ActivePerl installed, then download the latest version of vCLI from VMware and install, hopefully you should end up with a vCLI icon like below
vCLi can configure common tasks such as the following, I am not going to cover every single command so I will point you to the VMware vCLI documentation
- Create vSwitches
- setup DNS
- configure NTP
- Enable the iSCSI initiator
- configure NAS
vCLI can be frustrating sometimes due to the authentication process, it may take some time for the prompt to come back, all vCLI commands require a host (ESXi server or vCenter), username and password (HUP) to authenticate against the system prior to the command being executed. There are three ways to authenticate
| Use a session file |
## uses a cookie that expires after 30 minutes of nonuse, vCLI commands can be long especially when you add the authentication details for example
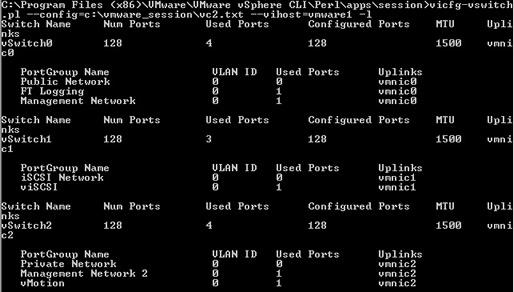
vicfg-vswitch.pl --server=vcenter1 --username=administrator --password=password --vihost=vmware1 -l
## to create a session file you can use the following command
save_session.pl --savesession=c:\vmware_session\vc1 --server=vcenter1 --username=administrator --password=password
## You should receive a message stating "Session information saved" and a file called vc1 should have been created, set a enviroment variable to ## point to this file
set VI_SAVESESSIONFILE=c:\vmware_session\vc1
## The contents of the session file is below, but they will be different than yours
#LWP-Cookies-1.0
Set-Cookie3: vmware_soap_session="\"096482A3-3638-4674-A83C-42BD007486F2\""; path="/"; domain=win-2008.local; path_spec; discard; version=0
Now we can use this session file as seen in the image below were I list all the vSwitches

|
| Create a configuration file |
## A configuration file holds the details of the server, username and password, you have to make file secure as it is a text file, an example is
##
below I called this vc2.txt
VI_SERVER=vcenter1
VI_USERNAME=administrator
VI_PASSWORD=password
## once you have created the file set the variable below
set VI_CONFIG=c:\vmware_session\vc2.txt
## now test the configuration file
|
| Pass-through the credential |
uses the current logon to the Microsoft Security Support Provider Interface (SSPI), to use this method all you need to do is use the below parameters to the command
--passthroughauth --passthroughauthpackage="kerberos" |
I am now going to list some of the more common commnds that you may use, there are many more so take a peak at the VMware documentation, this is a sort of get the feel for vCLI
| create a internal vSwitch |
vicfg-vswitch.pl --vihost=vmware1 -a=vSwitch1
## you can also create aport group on a vswitch by using th -A option
vicfg-vswitch.pl --vihost=vmware1 -A=vmware1-internal0 vSwitch1
## you can list the vswitches
vicfg-vswitch.pl --vihost-vmware1 -l |
| create a vSwitch with VLAN tagging |
## First create the port groups
vicfg-vswitch.pl --vihost=vmware1 -A=vlan10 vswitch1
vicfg-vswitch.pl --vihost=vmware1 -A=vlan11 vswitch1
vicfg-vswitch.pl --vihost=vmware1 -A=vlan12 vswitch1
## then set the VLAN value on the properties of the correct port group
vicfg-vswitch --vihost=vmware1 -v=10 -p vlan0 vswitch1
vicfg-vswitch --vihost=vmware1 -v=11 -p vlan0 vswitch1
vicfg-vswitch --vihost=vmware1 -v=12 -p vlan0 vswitch1
## Finally link the relevant NIC's to the vSwitch
vicfg-vswitch.pl --vihost=vmware1 -L=vmnic1 vSwitch1
vicfg-vswitch.pl --vihost=vmware1 -L=vmnic2 vSwitch1 |
| Create a VMKernel port for vMotion |
## create a port group called vmotion
vicfg-vswitch.pl --vihost=vmware1 -A=vmotion vSwitch3
## link the relevant NIC's
vicfg-vswitch.pl --vihost=vmware1 -L=vmnic3 vSwitch3
## configure the IP address and subnet mask
vicfg-vmnic.pl --vihost-vmware1 -a -i 192.168.2.190 -n 255.255.255.0 -p vmotion |
| Enable iSCSI initiator |
vicfg-vswitch.pl --vihost=vmware1 -a=vSwitch4
vicfg-vswitch.pl --vihost=vmware1 -A=ipstorage vSwitch4
vicfg-vswitch.pl --vihost=vmware1 -L=vmnic4 vSwitch4
vicfg-vswitch.pl --vihost=vmware1 -L=vmnic5 vSwitch4
## configure the IP address and subnet mask
vicfg-vmnic.pl --vihost-vmware1 -a -i 192.168.2.193 -n 255.255.255.0 -p ipstorage
## change the MTU to support jumbo frames
vicfg-vswitch --vihost=vmware1 -m=9000 vSwitch4
## Now enable the VMware iSCSI software initiator
vicfg-iscsi.pl --vihost=vmware1 -E -e
## check to see what virtual HBA device is used
vicfg-iscsi.pl --vihost=vmware1 -l -H
## now that you have the device, you can find out your IQN details
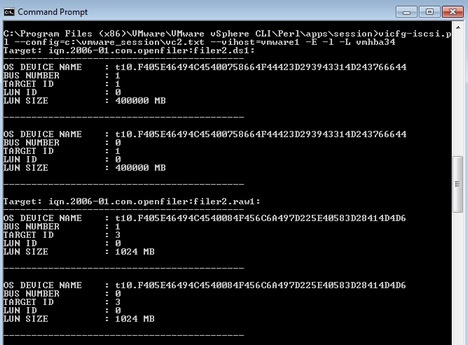
vicfg-iscsi.pl --vihost=vmware1 -E -l -P vmhba34
## now set the IQN for this interface
vicfg-iscsi.pl --vihost=vmware1 -I -n=iqn.2008-11.uk.co.datadisk:vmware1 -K=vmware1 vmhba34
## add the iSCSI target
vicfg-iscsi.pl --vihost=vmware1 -a -D -i=<openfiler IP address> vmhba34
## rescan and then list the available luns
vicfg-rescan.pl --vihost=vmware1 vmhba34
vicfg-iscsi.pl --vihost=vmware1 -E -l -L vmhba34
## here is simple session to display the current configured LUNs I have
|
| Set up your NTP |
vicfg-ntp.pl --vihost=vmware1 -a=0.uk.pool.ntp.org
vicfg-ntp.pl --vihost=vmware1 -a=1.uk.pool.ntp.org
vicfg-ntp.pl --vihost=vmware1 -a=2.uk.pool.ntp.org
## to stop and restart ntp use the below
vicfg-ntp.pl --vihost=vmware1 -s
vicfg-ntp.pl --vihost=vmware1 -r
## List the NTP servers
get-vmhostntpserver vmware1 |
| Manging Files |
## list the datastores available
vifs.pl --server=vmware1 --username=root --password=password -S
## upload a file, you must supply the "[datastore name] /directory"
vifs.pl --server=vmware1 --username=root --password=password -p=c:\w2k3.iso "[iso] /ms/w2k3.iso" |
| Snapshots |
## list VM on the server
vmware-cmd.pl -H vmware1 -U root -P password -l
## take a snapshot, using the information obtained above
vmware-cmd.pl -H vmware1 -U root -P password /vmfs/volumes/4d7f4f35-c02e5bd8-5946-00237d16ab10/linux01/linux01.vmx createsnapshot "Before Export" "Taken before using VM to 2gbsparse format" 1 1 |
| Backup existing ESXi server configuration |
## make sure you don't have any registered VM's on the ESXi server, a binary file will be created
vicfg-cfgbackup.pl --server=vmware1 --username=root --password=password -s c:\vmware1.bak
## Now factory reset your ESXi server, make no VM's are running on this server
vicfg-cfgbackup.pl --server=vmware1 --username=root --password=password -r -q
## Now restore the configuration
vicfg-cfgbackup.pl --server=vmware1 --username=root --password=password -l c:\vmware1.bak -f -q
|
PowerCLI
Lastly we come to PowerCLI, by default PowerCLI is already installed on Windows 7 (see screen shot below of my Windows 7 desktop PC) and Windows Server 2008 R2, otherwise you can download from the Microsoft website.
Once you have this installed you next need to download the vSphere PowerCLI from the Vmware website, then install this, hopefully you should end up with a icon like below
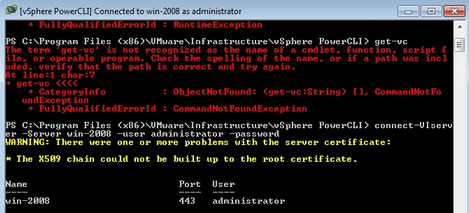
Because I installed PowerCLI on my desktop PC, when I open a window I am not connected to a vCenter (notice the error messages), to connect to a vCenter I use the connect-viserver command
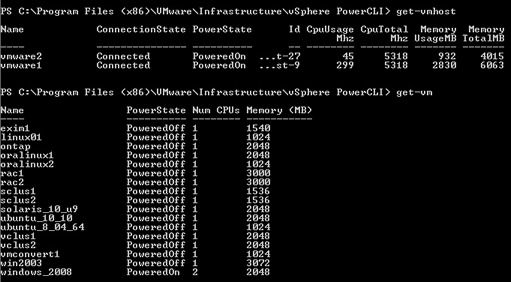
Once connected I can then run the PowerCLI commands, here I get a list of the current ESXi servers and VM's
Now I am not going to explain all the commands, so again go to the VMware documentation for a complete list, there are seven categories which you can carry out tasks
- Add - adding objects such as ESXI servers, vSwitches
- Get - listing objects
- Move - moving objects such as moving a VM from one ESXi server to another
- New - create new objects such as port groups, vSwitches
- Remove - remove objects
- Set - set a VM resource allocation
- Stop/Start - stop a vm or start an ESXi server service
You can also feed one command into another with the use of Pipes (|), if you know the Unix world then this will be familiar, I have listed some common commands below to get you started and to see what tasks you can perform using PowerCLI.
| List all the get commands |
get-command | where object { $_.name-like "get*" } |
| List ESXi servers and VM |
get-vmhost
get-vm |
| Disconnecting CD/Floppies |
get-vm | get-floppydrive | set-floppydrive -connected:$false
get-vm | get-cddrive | setcddrive -connected:$false |
| Port groups |
## List network adapters and sort them
get-vm | get-networkadapter | sort-object -property "NetworkName"
get-vm | get-networkadapter | sort-object -property "NetworkName" | where {'Production' -contains $_.NetworkName}
## rename a port group
get-vm | get-networkadapter | sort-object -property "NetworkName" | where {'Production' -contains $_.NetworkName} | set-networkadapter -Networkname 'production' |
| Maintenace Mode |
get-vmhost -name vmware1 | set-vmhost -state maintenace |
| List datastores |
get-datastore
## get the datastores on a particular ESXi server
get-vmhost -name vmware1 | get-datastore
|
| Create a datacenter with folders |
## Create the DataCenter first
new-datacenter -location (get-folder -Name 'UK DataCenters') -name 'Milton Keynes DataCenter'
## Now create the folder inside the DataCenter
new-folder -location (get-datacenter -Name 'Milton Keynes DataCenter') -name 'AMD Hosts'
new-folder -location (get-datacenter -Name 'Milton Keynes DataCenter') -name 'Intel Hosts' |
| Create a cluster |
new-cluster -location (get-datacenter -name 'Milton Keynes DataCenter' | get-folder -name 'AMD Hosts') -name 'AMD Cluster' -HAEnabled -HHAdmissionControlEnabled -HAFailoverLevel 2 -DRSEnabled -DRSMode PartiallyAutomated |
| Adding hosts to a datacenter or cluster |
add-vmhost vmware1 -location (get-datacenter 'Milton Keynes Datacenter') -user root -password password |
| Triggering vMotion |
move-vm (get-vm -name 'linux01') -destination (get-vmhost vmware1) |
Now that you have a feel for the commands, you can create scripts to run multiple commands, save the script with the extension of .ps1 then just run it, if it complains that you are not authorized then run the command "set-executionpolicy unrestricted", remember this is dangerous as you can run any command but it will at least get your going on you test setup.