This section covers patch management using VMware Update Manager (VUM), there also is a vSphere update utility that is used to patch ESX servers and upgrade from ESXi 3 to ESXi 4, as it is free it is ideal for anyone who has downloaded the free ESXi server and wants to keep costs at a minimum. VUM is the bells and whistles update manager, it comes in two flavors, stand-alone and as a plug-in to vCenter. It patches and upgrades ESXi servers and optionally can patch windows-based VM's using the popular website http://shavlik.com as the source for windows, you are also able to add additional source website that caould patch Redhat, Oracle, Ubuntu, etc.
The new features in version 4 are
- Staging patches to ESX servers which allow a pre-download of the patches locally to each ESX server prior to remediation and should speed up the patching process and thus reducing the time spent in maintenance mode
- Baseline Groups which allow the administrator to group many different baselines together under a single name and apply the group to a vCenter object
Patching is a major operation, lots of preparation work goes in before hand to make sure that everything goes smoothly, in a ideal world you generally patch Development first followed by QA and by the time you get to patching your Production all the little wrinkles should be ironed out, however in the VMware small companies may have these environments in a single cluster. VMware updates do come regularly with about 4 major updates a year, which means that a lot time can be spent on patching, this is where the update managers can help.
Patching can be a dangerous game, some administrators believe that if the environment is working then why patch, especially if the environment is contained and has no access to the internet, patching could cause problems where there were none before. I am a strong believer in patching especially if you follow the applying to Dev, QA and finally Production environments and in a controlled manor, you would never not service your car on a regular basis, otherwise you just know that one day it will stop working. Besides security, patching also helps performance, with the latest drivers and kernel releases to enhance the O/S and fix any potential bugs that you may have not experienced yet, like I said the fear with patching is that you break something that was already working as this never goes down well with management.
VMware Update Manager (VUM)
The update managers main job is to patch ESX servers and VM's, I will be covering the installation of VUM into vCenter and then using baseline groups for patching, and then scan the datacenters, clusters or VM's to see if this baseline is meet. You can manually apply patches or schedule it and it can be achieved with the VM online or offline, you can also setup for it to rollback any changes should the patching go wrong or cause any problems at a later date (yes we will be using snapshots).
Updates are performed in three stages
- Baseline - create a list of patches that form a "company standard" for all ESX servers and VM's
- Scan - check against the baseline for compliance
- Remediation - patch ESX servers and VM's that fail to meet the baseline
First we have to install and configure VUM, there are three ways to run VUM
- run the VUM service on the same windows instances as the vCenter this must have access to the internet
- install VUM on a separate windows server instance that is connected to the internet (this method is more secure)
- using a USB stick to download the patches so that they can be imported into the VUM service (this is most secure method but does have its problems)
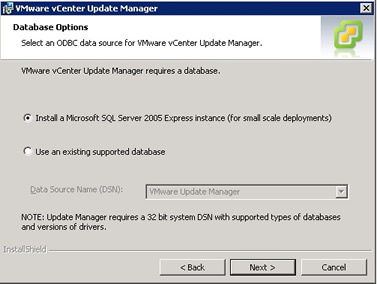
Which method you choose all comes down to what you will allow to connect to the internet and cost, most companies choose the second option, however this is not the most cost effective as you have to have a second windows server running. For this tutorial I will be showing the first option, I will install VUM onto the Windows 2008 server which has vCenter installed, also you have a choice on where the VUM database is stored, you can create a separate one or configure it to use the same one as the vCenter uses, I will be creating a separate stand-alone one as I did for vCenter.
If you decide to install the VUM on a separate Windows server then you will need to create an account that can access the vCenter, If you are installing onto the same server as vCenter then follow below
| Install VUM |
I am install VUM on the same Windows 2008 server as my vCenter, I am not going to show you every screen shot as some are simple answers to simple questions, first start the install process by inserting the CD into the drive, you should then get the screen below, select the "vCenter Update Manager", you will be asked to put in the details of your vCenter server

The next screen that you come too will ask to you choose either to install a separate SQL database or select another DB or you can select the existing vCenter database, I have chosen to create a new separate database as my environment is only small
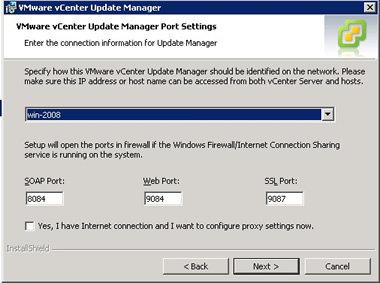
Next comes the port settings dialog box, change any port numbers if they clash with other software, I selected the defaults
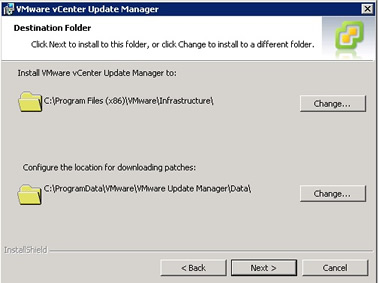
You can optionally change the folder destinations if you wish, I accepted the defaults
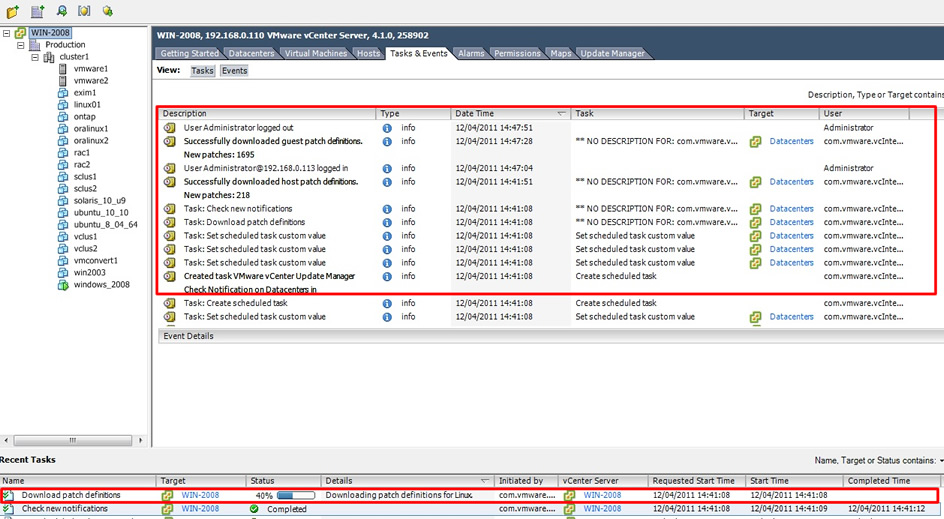
The installation will finish and the VUM service will be started, this will start to download the latest signatures from the internet, it will check both VMware and Shavlik web sites. You can see in the tasks and events window the patches that are being downloaded
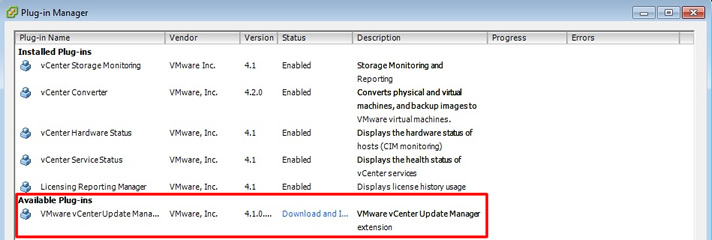
Once the patches have finished downloading, you can now install the VUM client plug-in, select plug-ins from the top menu bar, then select "manage plug-ins", you should then see the below screen, select the "download and install" link, this is where you may get errors if you have not entered the details of your vCenter correctly.
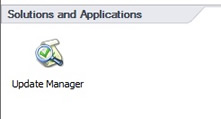
Once this has completed there will be many new windows and icons that appear, first in the Home page you will see a new category called "Solutions and Applications" and a new icon called "Update Manager"
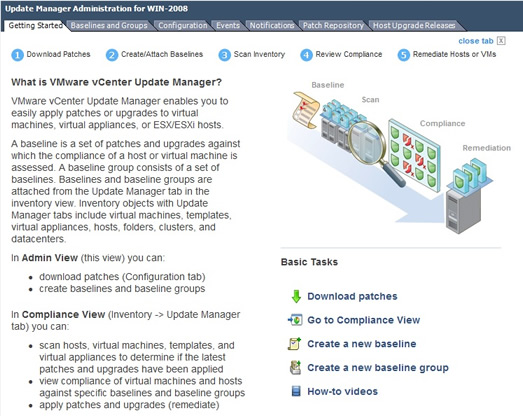
Selecting this icon takes you into the update manager, with many tabs and links, I will be covering these in more detail below
|
Baselines and Baseline Groups
First we need to define a baseline, but I will show you the two built-in baselines for use with ESXi servers, select the "update manager" icon from the home page then select the "baselines and groups" tab, there are two types of baselines critical and non-critical.

Baselines are basically lists of possible vulnerabilities and are used in the scanning process to see if a ESXi server or VM meets your requirements, it maybe that just these two baselines are good enough for your needs. You can create baselines for different data centers, clusters, ESXi servers and VM's the combinations are endless. Your baselines can be either dynamic (maintained by the update system) or fixed (manually controlled by the administrator).
Lets create a baseline
| Create a baseline |
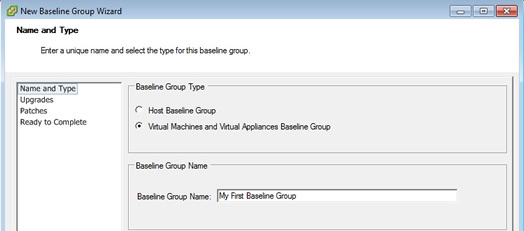
To create a new baseline select the "create link" and the below screen should appear, type in a friendly name and then select VM patch radio button, you can choose to patch ESXi server, VM's or Virtual Appliances
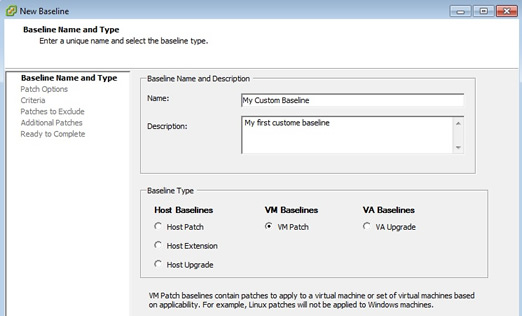
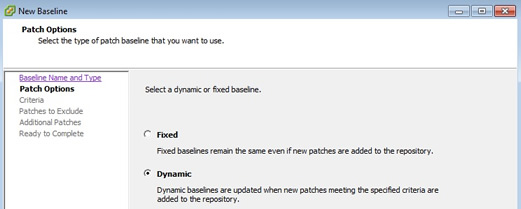
I have chosen dynamic, thus this baseline will be maintained by the system
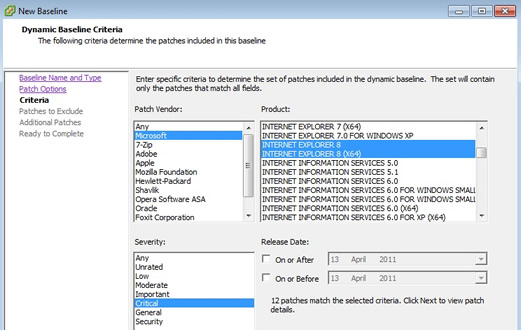
There are many patches, I have limited mine to just internet explorer 8 and selected critical only
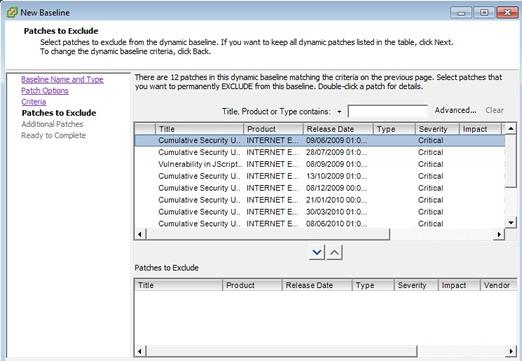
Here you can excluded specific patches if you wish
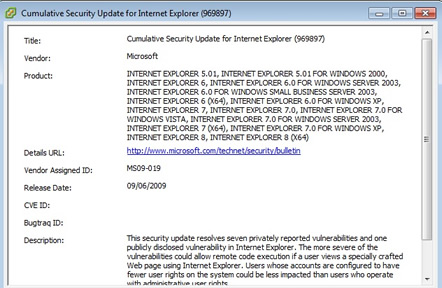
If you double click on the patch you can get more detailed information
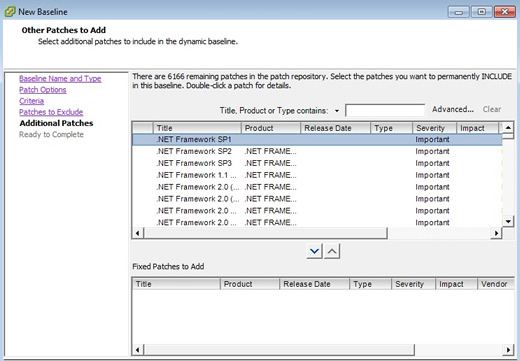
the next screen allows you to add additional patches, again the combinations are endless
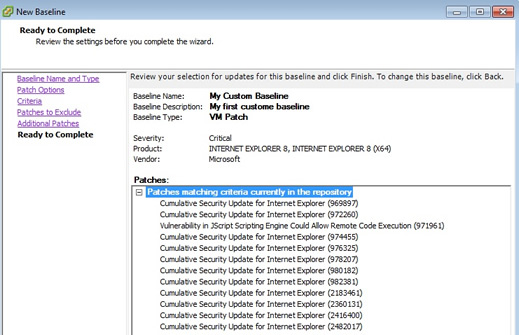
Finally you get to the summary screen
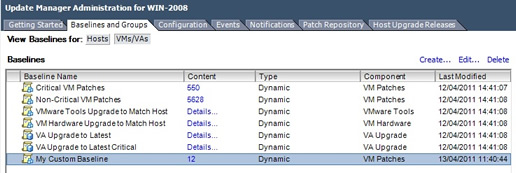
Once completed you should see your baseline, as you can see my baseline only has 12 patches to apply and that it is also a dynamic baseline, the default non-critical baseline has 5268 patches WOW!
You can edit the baseline by choosing the edit line
|
New in version 4 is the ability to create baseline groups, creating a group is much like the process we used above
| Create baseline group |
To create a baseline group you use the left panel in the baseline and groups tab and select create, the below screen should appear, type in a friendly name and choose the baseline group type
optionally select an upgrade baseline

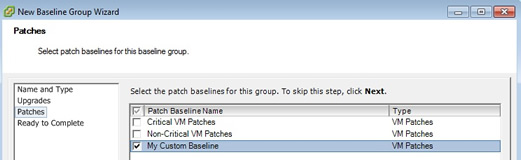
Here I have added my newly created baseline "My Custom Baseline"
Finally the summary screen
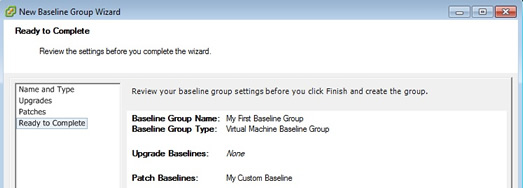
My newly created baseline group appears in the baseline groups window, you can update this group with new baselines using the edit link, you can expand the baseline group to display all the baselines attached to this group

|
Scanning and Patching a VM
Now that we have a baseline group that contains a baseline we can start to scan datacenters, cluster, VM's to see if any VM's require patching
| scan a datacenter, cluster, VM |
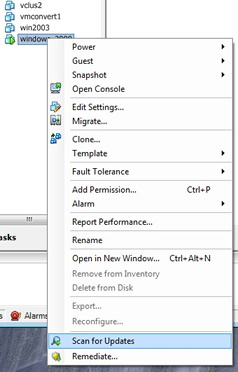
There are several ways to scan, the first is by selecting home page -> VM's and templates -> then right-click on the VM and selecting "scan for Updates"
You can choose to select the whole datacenter
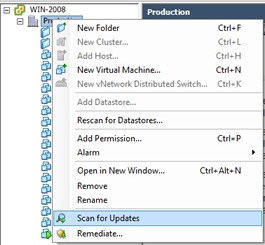
optionally you can use the two icons on the tool bar, the one with the spy glass is the scan button, the other button is the remediate button which we will discuss later

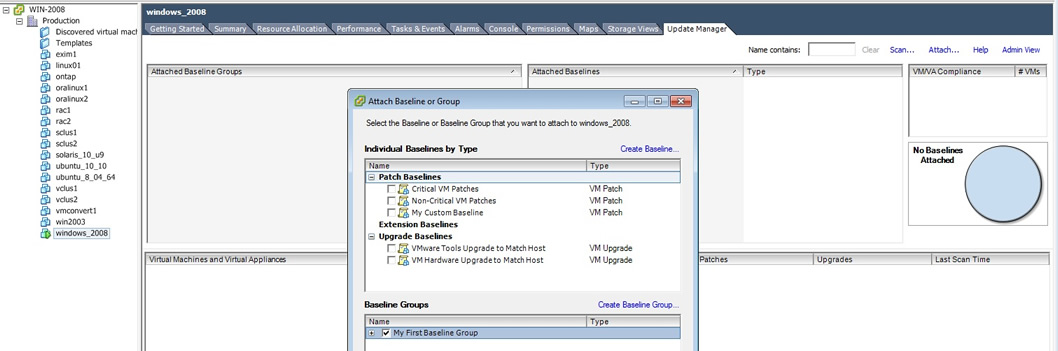
You can also attach a baseline group to a datacenter, cluster or VM, select from the home page -> template and hosts -> select the datacenter or cluster or VM -> then select the "update manager" tab, you should see the window below, then select the attach link and tick the "My First Baseline Group" in the baseline group box
The result should appear like below
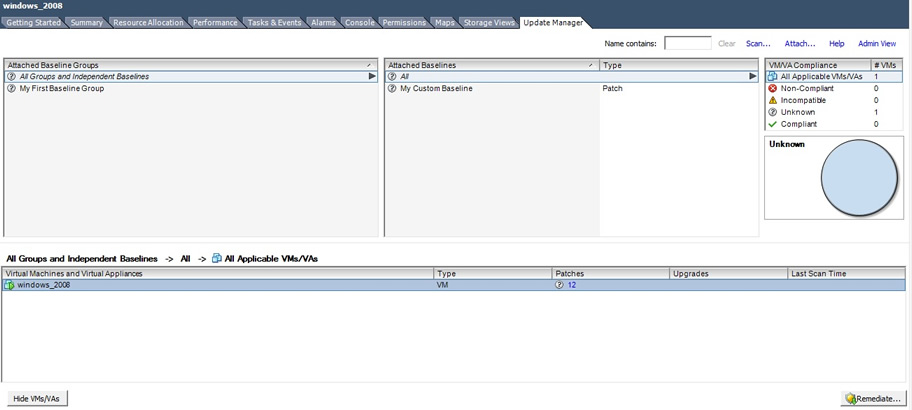
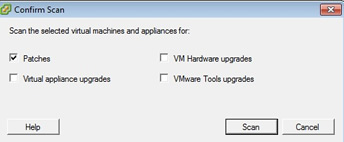
From here you can select scan, you can choose what patches you want to scan
Eventually the scan report comes back, here I had problems which need to be investigated
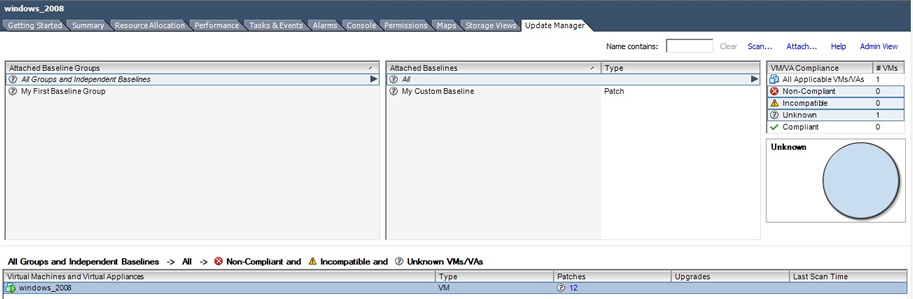
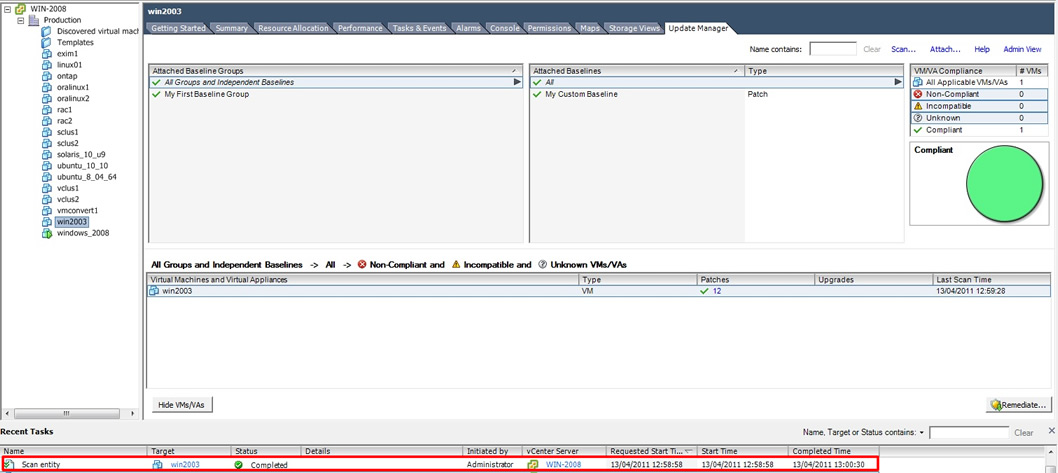
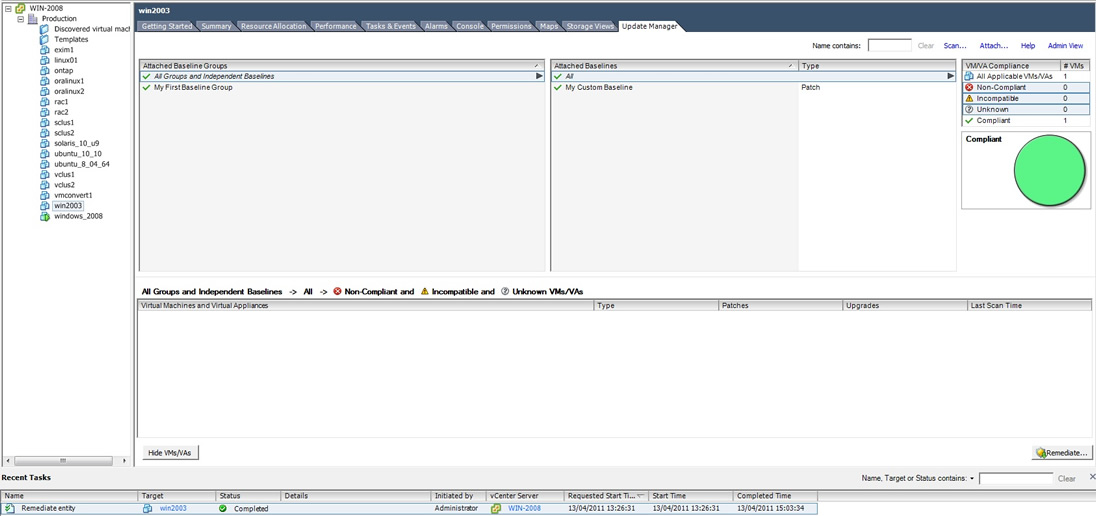
I tried the same baseline group on my Windows 2003 which reported back as Compliant
|
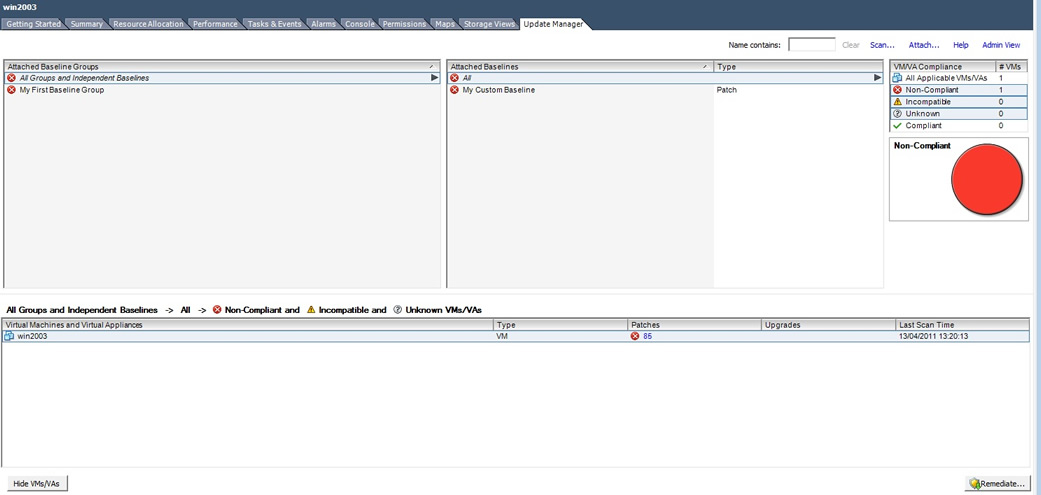
Now we can patch a VM, this is called remediate in the VMware world, I have added a few more patch requirements to my baseline and will apply this to my Windows 2003 server
| Patch (remediate) a VM |
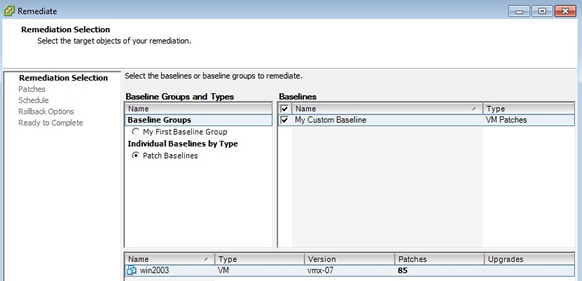
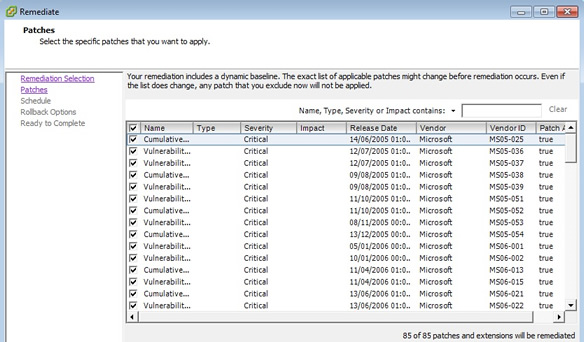
Again you can patch a whole datacenter, cluster or a VM. Here I am going to patch just a Windows 2003 VM, first here is the report I got back after a scan (I added a few patches to my baseline), you can see that this server requires 85 patches and is non-compliant, also notice that the VM is powered down
To start the patching select the remediate button in the bottom right-hand corner, and the below screen will appear, you can see that all 85 patches will be applied
A list of the patches is displayed, you still have the chance to exclude any patches if you wish
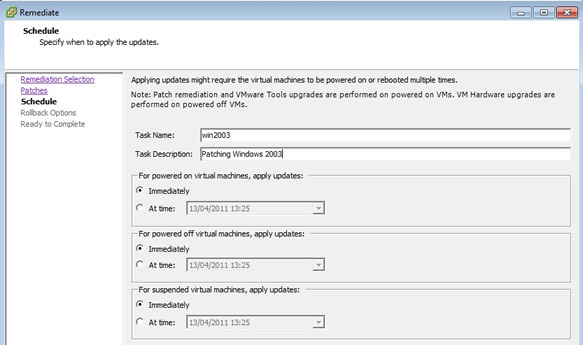
Here is a nice feature you can actually schedule the patching to be done at any time of the day, may be you have quiet periods where you can perform the patching
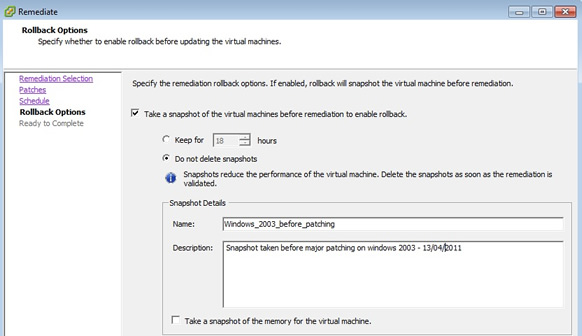
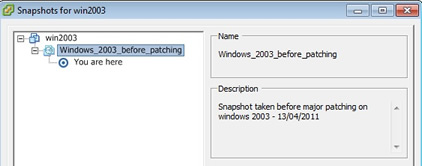
You can take a snapshot of the VM before the patch, thus you can roll back if the patch causes any problem
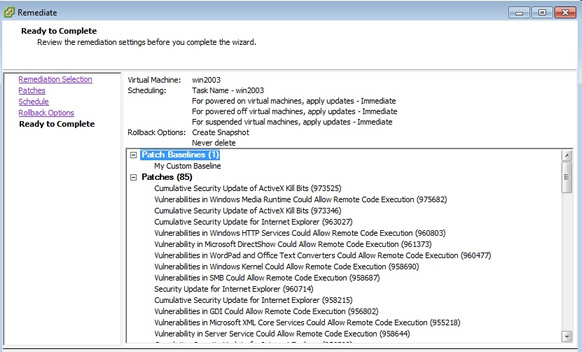
Finally we get to the summary screen
You can watch the progress in the "recent tasks" panel, the VM will be powered and a snapshot taken first

You can see the snapshot from the VM snapshot manager window, this is our rollback option if it all goes pear shaped
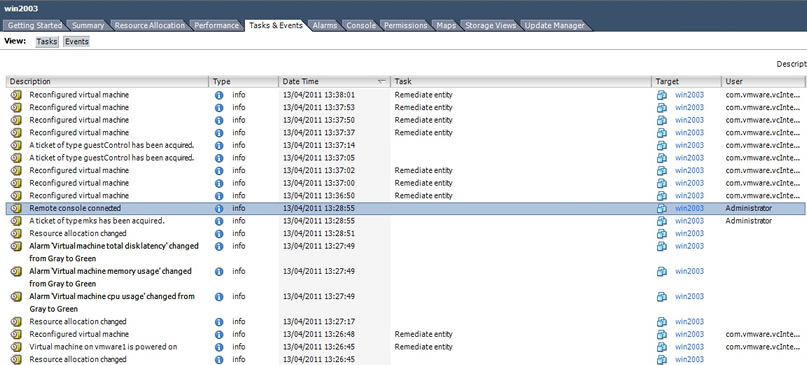
You can watch the progress in more detail from the "tasks and events" window, if you look at the task you can clearly see the remediate entries
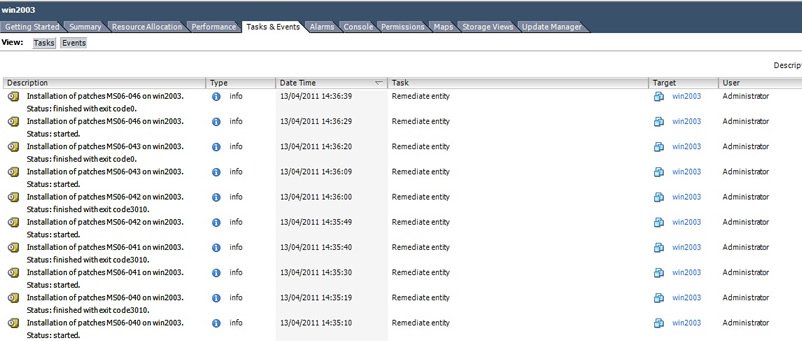
After the patches are download then are then applied to the server, you can see the Windows patches being applied the screen refresh automatically
as the process finishes the VM gets powered down and the update manager gets updated
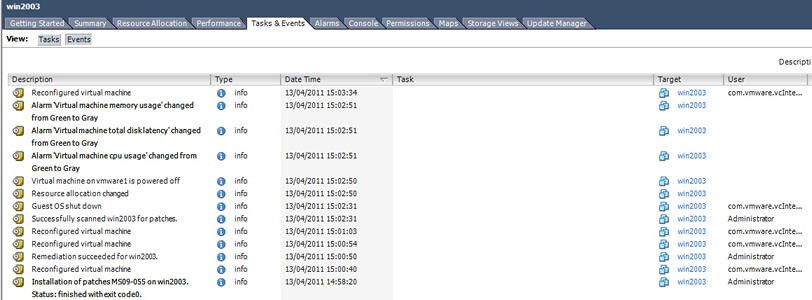
depending on how much patching you are doing the process completes and updates the manager, as you can see my Windows 2003 is now compliant it took just over 1.5 hours to complete
|
Patching ESXi servers and Clusters
In version 4 a new feature called staging has been implemented, this allows you to download the patches for an ESXi server but prevents you from applying the patch, this allows VMware to have the patches downloaded locally to each ESXi server, prior to triggering the patch installation process, the intention is to speed up the patching process and reduce the amount of time that an ESXi server is in maintenance mode, especially if you have a slow internet connection speed.
| Patch a ESXi server or cluster |
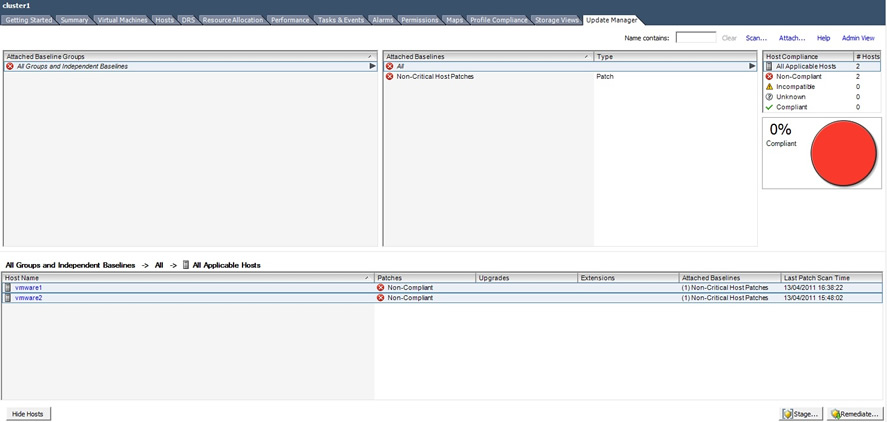
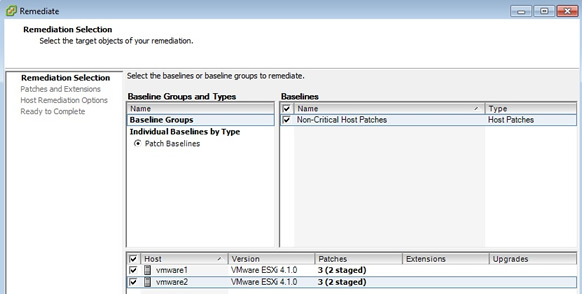
First we will stage the patching process, select "hosts and clusters" from the home page -> select the "update manager" tab -> attach a baseline group, I have selected the "non-critical Host patches" baseline group and as you can see my cluster requires patching as it is not compliant
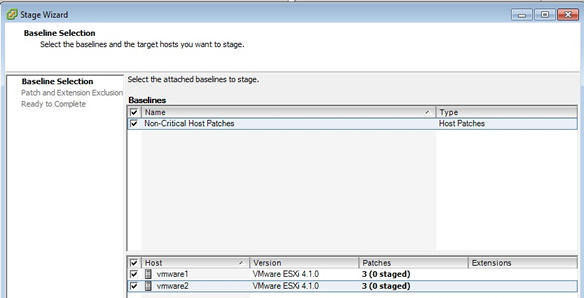
Selecting the stage button in the bottom right-hand corner, brings up this screen, you can select/deselect any additional baseline groups that you need, make sure all ESXi servers within the cluster have been ticked
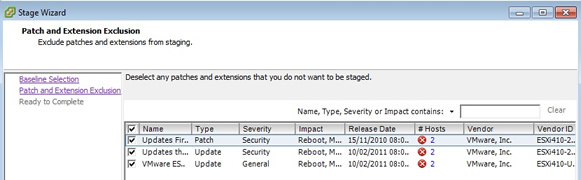
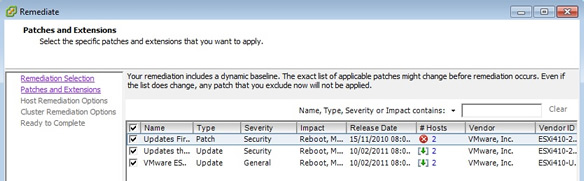
Here you can exclude any patches that you don't want to install, IMPORTANT look at the impact column this will indicate if the ESXi server requires rebooting or if it will be put into maintenance mode
Finally a summary screen

The patches will be download to each ESXi server but will not be applied

Once the patches have been downloaded (or staged), you can remediate them, this is very similar to the patching of a VM, make sure that both ESXi servers in the cluster are selected
again you can exclude/include any patches if you wish
we can schedule a specific time to patch if we wish, I selected the defaults
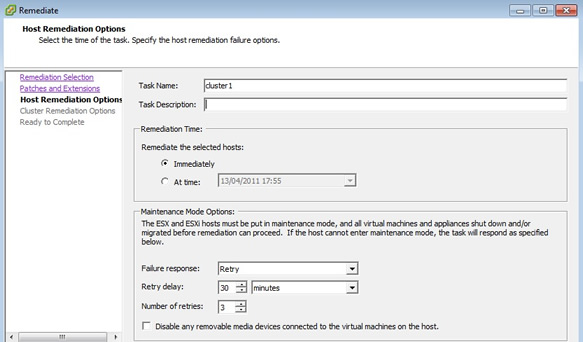
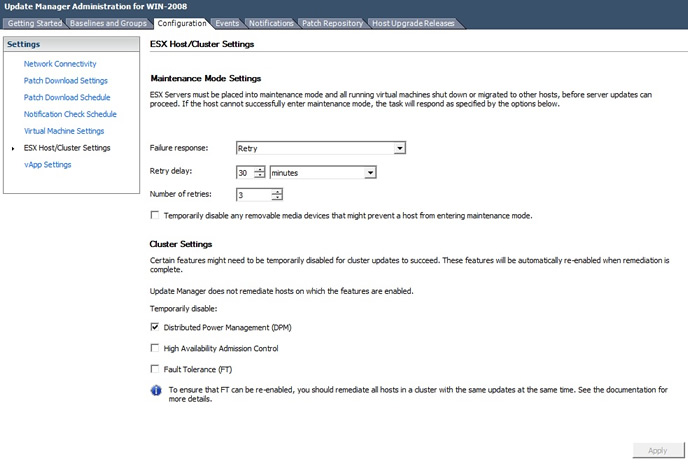
This screen is different to a VM patch, here we can disable advanced features of VMware as it may cause problems when we patch each ESXi server, notice the "Generate Report" button, make sure to click this and see if there are any potential errors that could cause the patching to fail, fix any problems before continuing, you can select the Disable DPM and Disable HA to solve two of the problems.

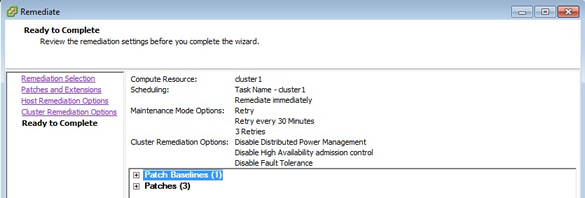
Finally we get to the summary screen
the first ESXi server vmware1 is put into maintenance mode (noticed I had to turn on the EVC mode, see my DRS section for more information on EVC)
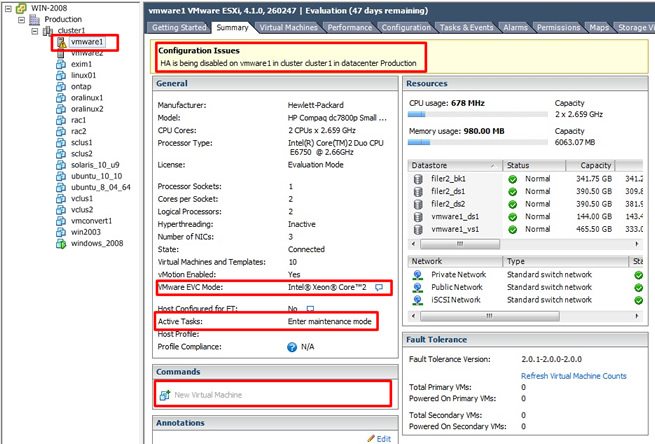
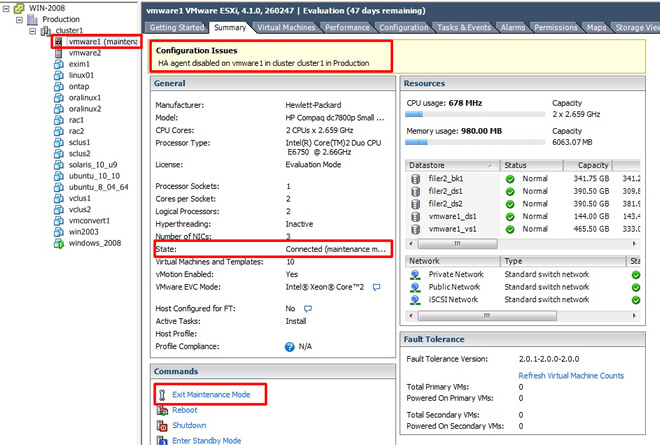
Once the ESXi server is in maintanance mode, the HA agent is disabled and as you can see the state is connected (maintenance mode), the patch is now applied to the ESXi server and then rebooted
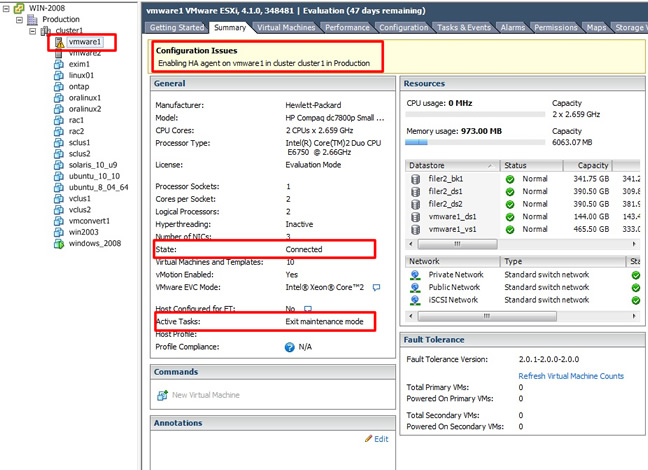
Once the server returns, the HA agent is enabled and the ESXi server exits maintenance mode
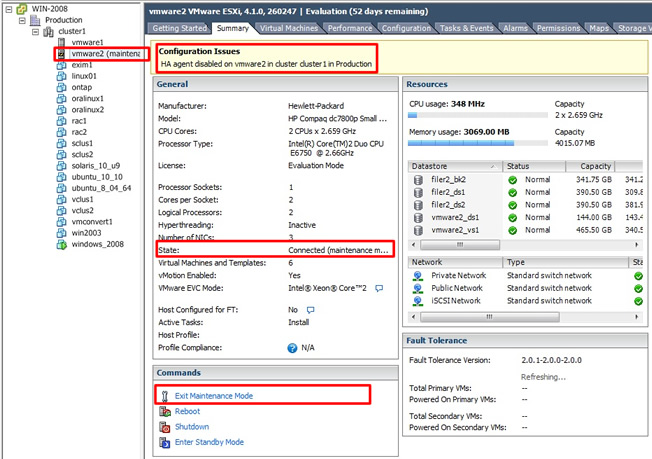
We then move onto the next ESXi server vmware2, however a VM has to be migrated first (windows_2008), once the VM has migrated the whole process repeats for this ESXi server (vmware2)
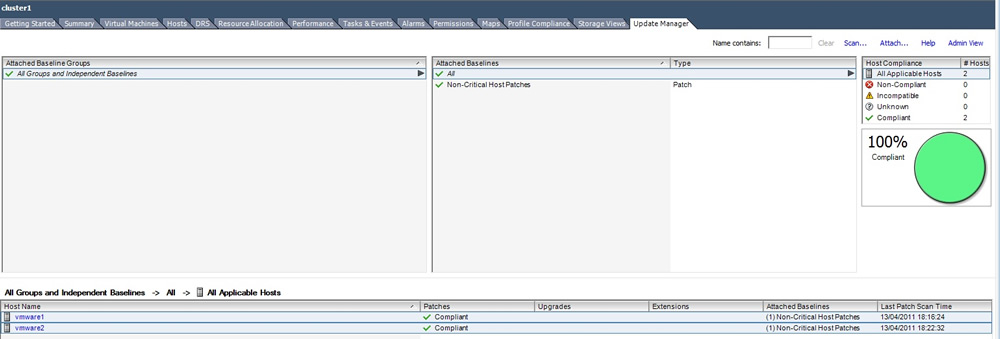
Finally both ESXi servers (vmware1 and vmware2) have been patched and reboot and the update manager returns with both ESXi servers are now compliant
|
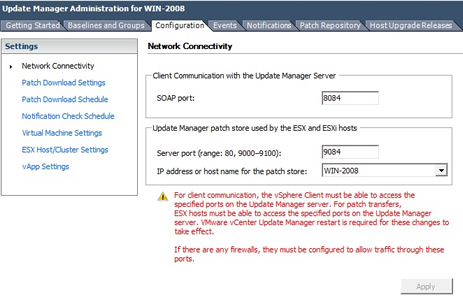
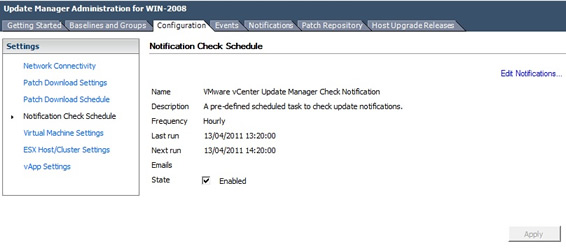
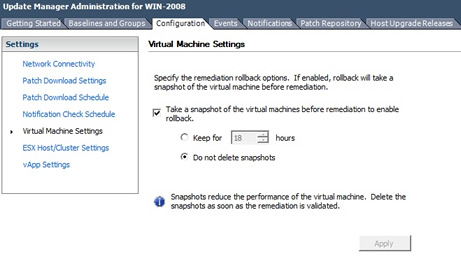
Update Service Settings
Lastly you have a number of options that you can set within the VUM, select the from the home page -> update manager -> then select the configuration tab, the first screen you can change the port settings
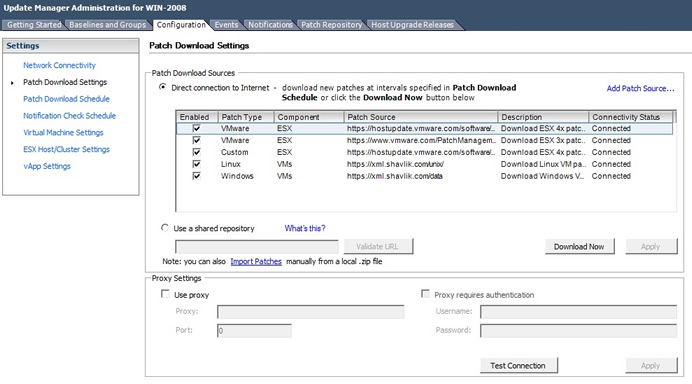
the next screen you can add additional source web sites, you can see the VMware and the shavlik web sites have already been added , you possibly could add Redhat, Oracle, Ubuntu, via the "add patch source" link
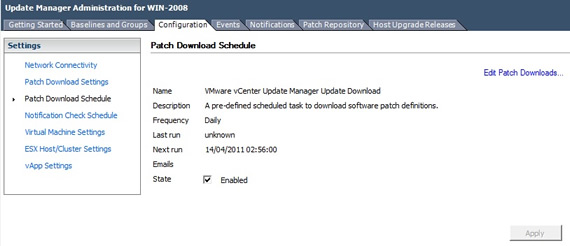
Next you can select a predefined time when you want to download the patches, select the "edit patch downloads" link to change the time
You can also change the notification check schedule, possibly sending emails out
You can set a default for the snapshot of a VM before patching
Lastly you can change maintenance mode settings and cluster settings